
Row & Column
Flutter에서 스크린 단 분리를 할때 StatelessWidget을 상속받아서 만들어왔었다.
이걸 일일이 작성하기 귀찮아서 Flutter는 stless 키워드를 차면 자동 완성을 해준다.
class HomeScreen extends StatelessWidget {
  const HomeScreen({Key? key}) : super(key: key);

  @override
  Widget build(BuildContext context) {
    return const Placeholder();
  }
}
위의 템플릿을 이용해 아래와 같이 작성해왔었는데 스크린 단의 클래스를 디렉터리에 따로 모아서 하는게 더 편하므로, HomeScreen 클래스를 따로 만들어 준다.
void main() {
  runApp(
      MaterialApp(
        home: HomeScreen(),
    ),
  );
}

class HomeScreen extends StatelessWidget {
  const HomeScreen({Key? key}) : super(key: key);

  @override
  Widget build(BuildContext context) {
    return Scaffold(
      body: Center(
        child: Text('abc'),
      ),
    );
  }
}
위의 Home Screen을 lib 하위에 screen 디렉터리를 만들어 home_screen.dart 파일로 만들어 import를 써서 가져왔다.
import 'package:flutter/material.dart';
import 'screen/home_screen.dart';

void main() {
  runApp(
      MaterialApp(
        home: HomeScreen(),
    ),
  );
}
이제 별도의 디렉터리에 Widget을 만들 수 있게 되었다.
그럼 이제껏 써왔던 child가 하나만 있는 Center는 그만쓰고 위젯을 컨테이너에 담듯이,
위젯들을 담을 수 있는 Container()를 사용해서 위젯을 만들어보자.
아래 코드를 보면 Container() 내부에 Column이 있고 그 Column 안에서 컨테이너들을 정의해줬다.
class HomeScreen extends StatelessWidget {
  const HomeScreen({Key? key}) : super(key: key);

  @override
  Widget build(BuildContext context) {
    return Scaffold(
      body: Container(
        color: Colors.black,
        child: Column(
          children: [
            Container(
              color: Colors.red,
              width: 50.0,
              height: 50.0,
            ),
            Container(
              color: Colors.orange,
              width: 50.0,
              height: 50.0,
            ),
            Container(
              color: Colors.yellow,
              width: 50.0,
              height: 50.0,
            ),
            Container(
              color: Colors.green,
              width: 50.0,
              height: 50.0,
            ),
          ],
        ),
      ),
    );
  }
}
화면을 띄워보면 다음과 같이 좌측에 위젯의 색깔이 나온다.
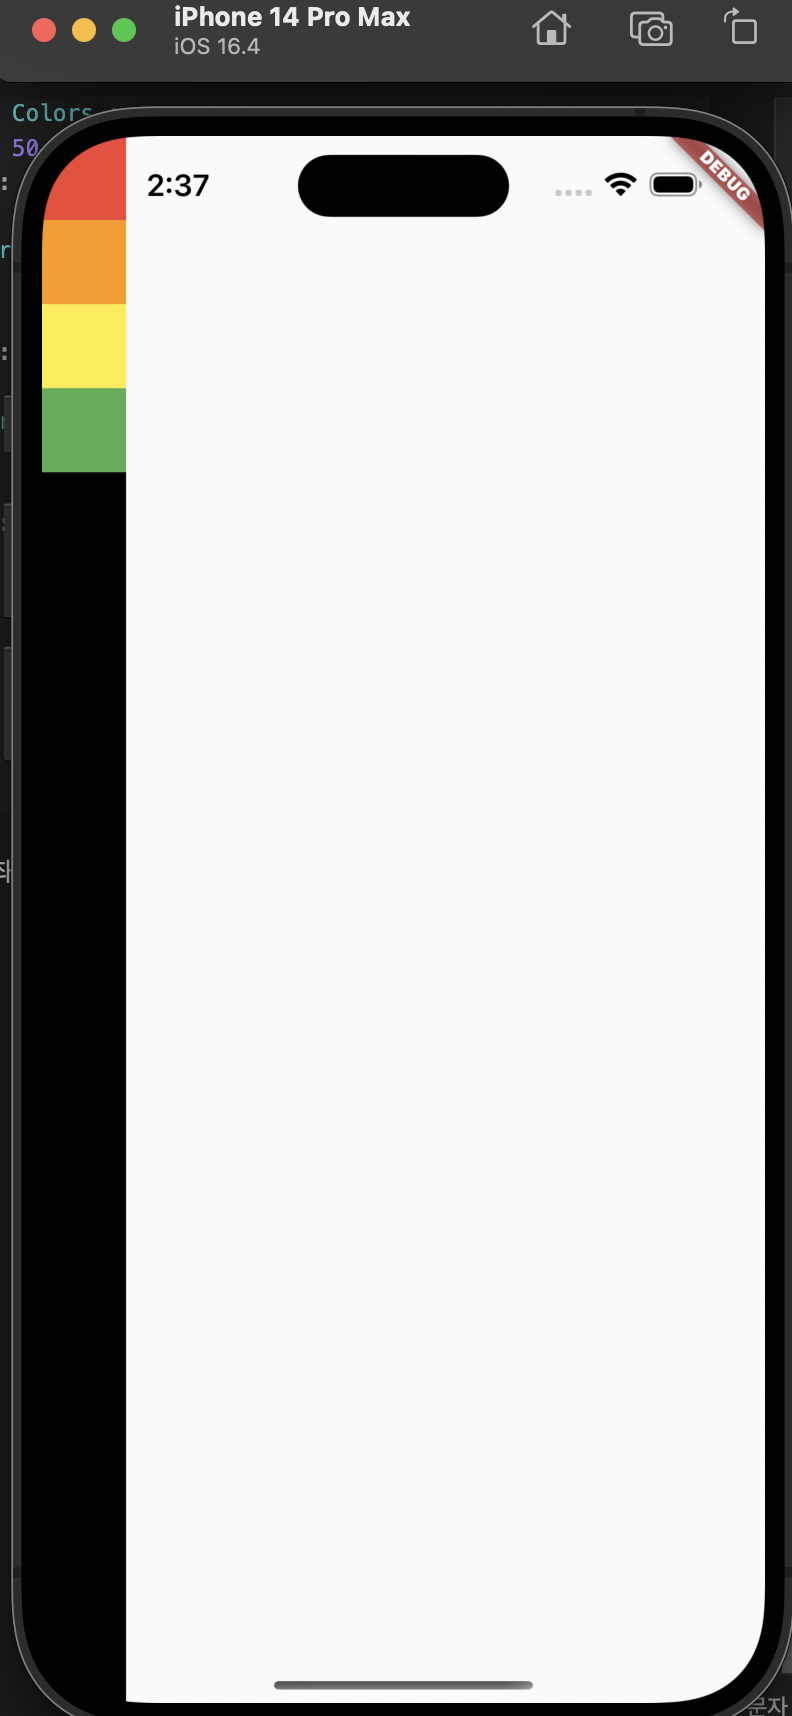
화면을 보면 좌측 상단의 시간을 표시하는 상단 상태바에까지 위젯이 파고 들어간걸 볼 수 있다.
이 상황을 방지하기 위한 Safe Area라는 위젯을 추가로 사용할 것이다.
Safe Area 위젯은 Area 내부에 있는 위젯들을 시스템 영역의 위젯들로부터 분리 시켜준다.
(ex : 시간 와이파이, 홈버튼 등으로부터 분리시켜 준다.)
import 'package:flutter/material.dart';

class HomeScreen extends StatelessWidget {
  const HomeScreen({Key? key}) : super(key: key);

  @override
  Widget build(BuildContext context) {
    return Scaffold(
      body: SafeArea(
        child: Container(
          color: Colors.black,
          child: Column(
            children: [
              Container(
                color: Colors.red,
                width: 50.0,
                height: 50.0,
              ),
              Container(
                color: Colors.orange,
                width: 50.0,
                height: 50.0,
              ),
              Container(
                color: Colors.yellow,
                width: 50.0,
                height: 50.0,
              ),
              Container(
                color: Colors.green,
                width: 50.0,
                height: 50.0,
              ),
            ],
          ),
        ),
      ),
    );
  }
}
위 코드처럼 Safe Area 안에 위젯들을 묶어주면 시스템 위젯들과 겹치지 않게 분리를 해준다.
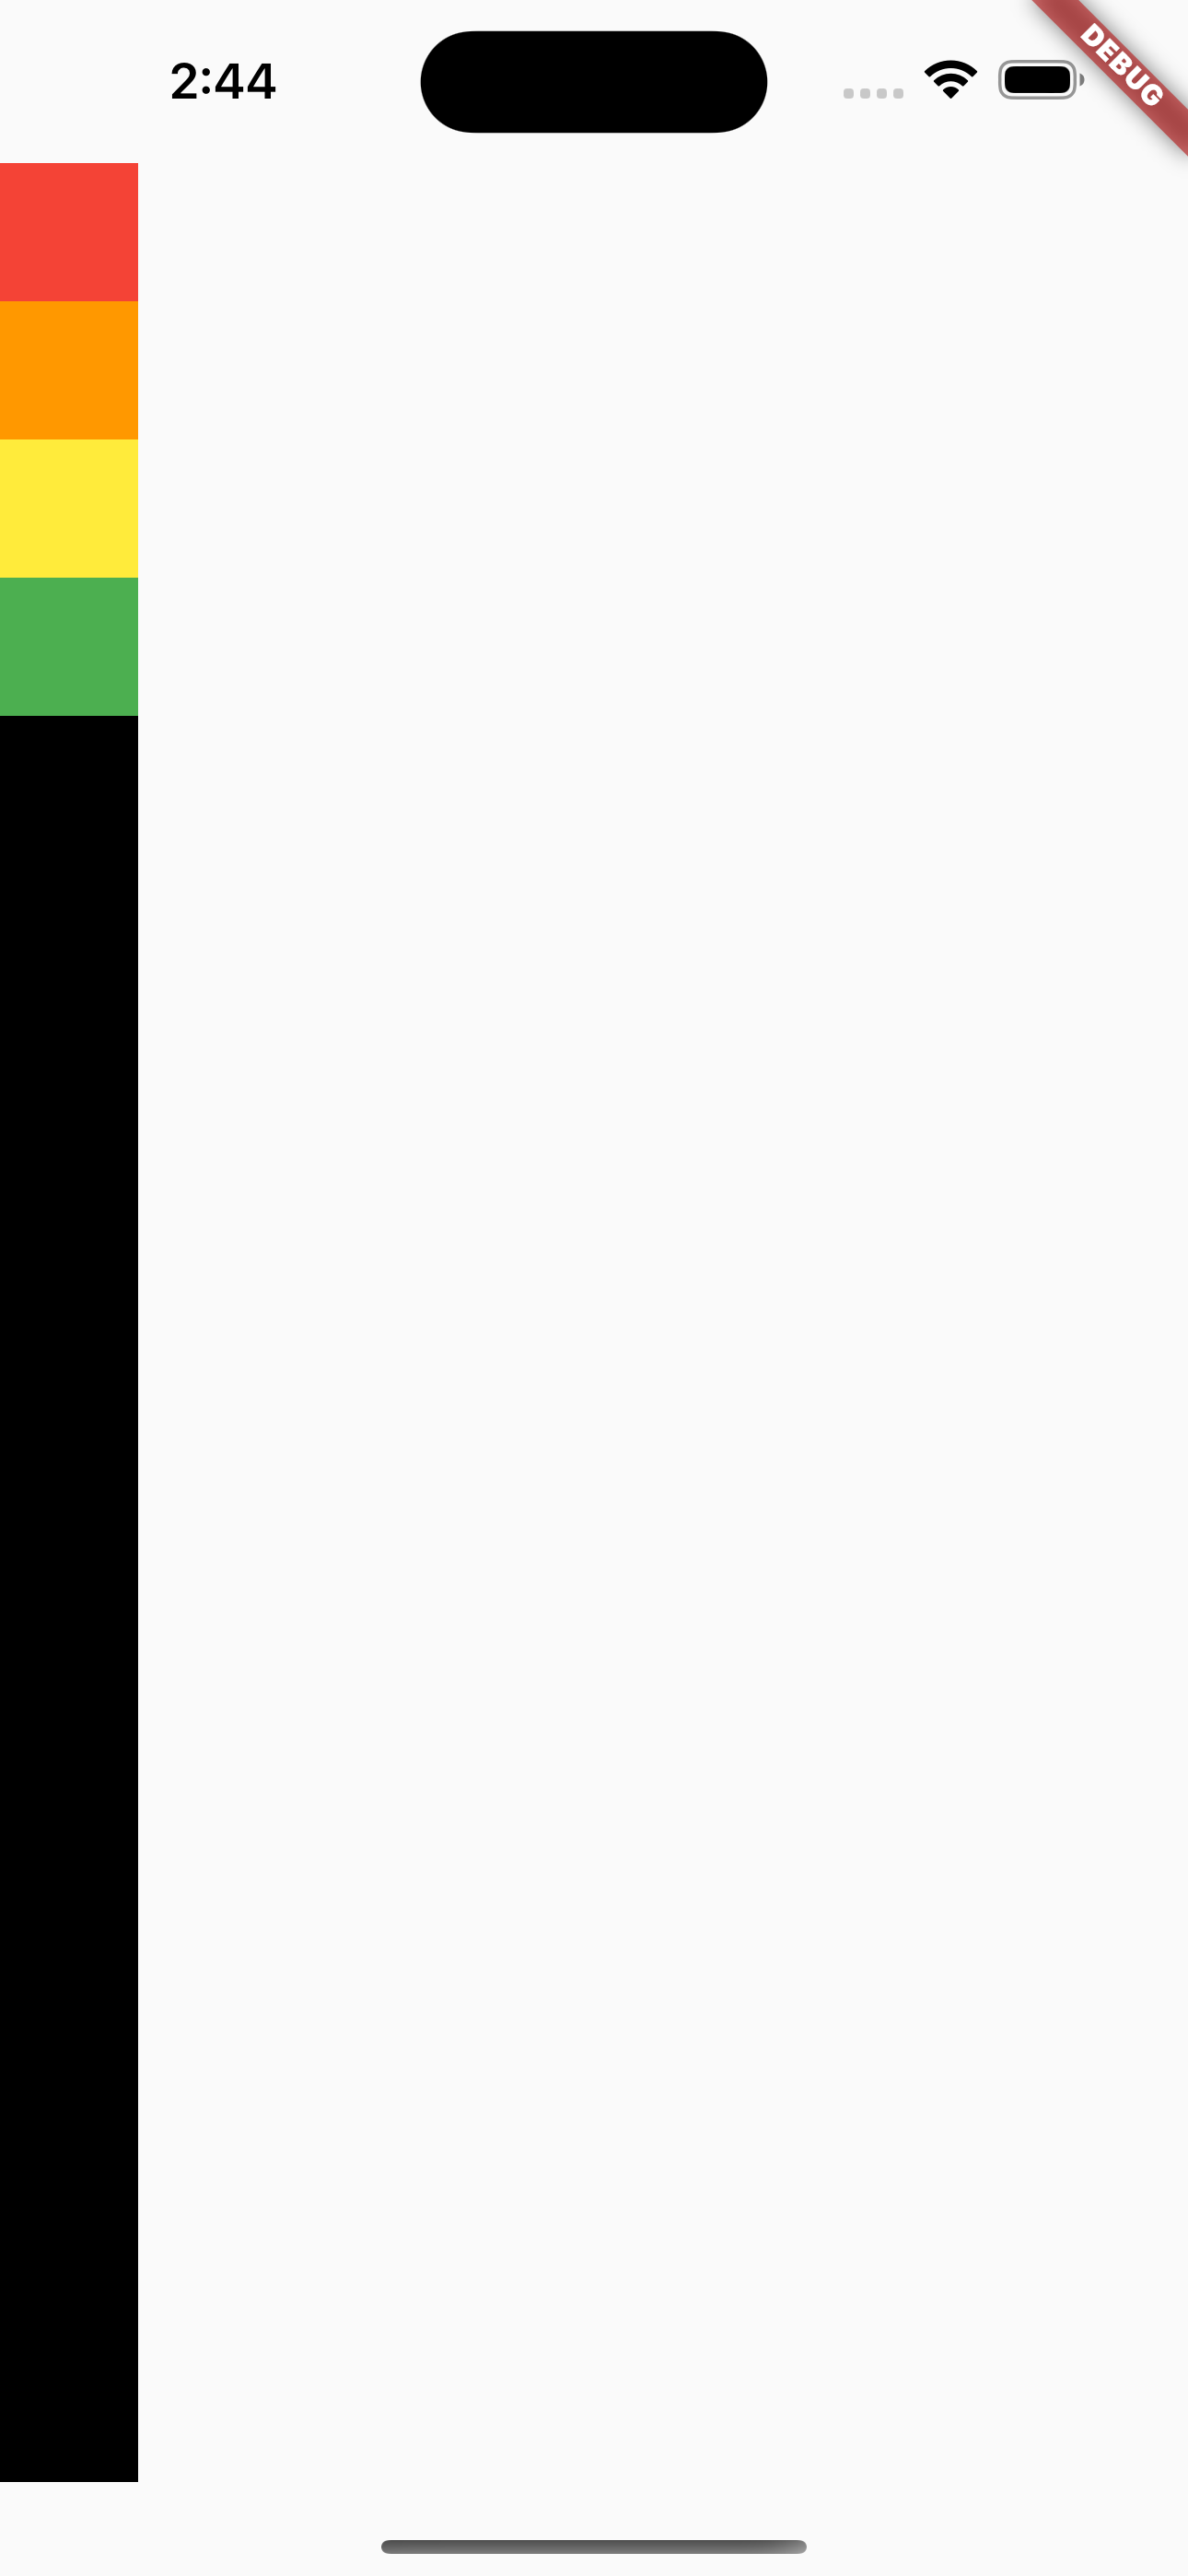
만약 전체화면 느낌이 잘 안나서 화면의 하단부분까지는 겹치게 하고 싶다면,
Safe Area Widget의 파라미터를 이용하면 된다.
Command + B 를 Safe Area에 대고 입력하면 파라미터들이 나온다.
const SafeArea({
  super.key,
  this.left = true,
  this.top = true,
  this.right = true,
  this.bottom = true,
  this.minimum = EdgeInsets.zero,
  this.maintainBottomViewPadding = false,
  required this.child,
}) : assert(left != null),
     assert(top != null),
     assert(right != null),
     assert(bottom != null);
대충만 봐도 저 bottom 값을 건드리면 될것 같다.
import 'package:flutter/material.dart';

class HomeScreen extends StatelessWidget {
  const HomeScreen({Key? key}) : super(key: key);

  @override
  Widget build(BuildContext context) {
    return Scaffold(
      body: SafeArea(
        bottom: false,
        child: Container(
          color: Colors.black,
          child: Column(
            children: [
              Container(
                color: Colors.red,
                width: 50.0,
                height: 50.0,
              ),
              Container(
                color: Colors.orange,
                width: 50.0,
                height: 50.0,
              ),
              Container(
                color: Colors.yellow,
                width: 50.0,
                height: 50.0,
              ),
              Container(
                color: Colors.green,
                width: 50.0,
                height: 50.0,
              ),
            ],
          ),
        ),
      ),
    );
  }
}
Bottom을 False로 해주면 밑의 부분까지 위젯들이 내려오게 된다.
'📘 Frontend > Flutter' 카테고리의 다른 글
| Flutter - Row and Column (Expanded & Flexible Widget) (0) | 2023.05.29 |
|---|---|
| Flutter - Row and Column (CrossAxisAlignment) (0) | 2023.05.29 |
| Flutter - Row and Column (MainAxisAlignment) (0) | 2023.05.29 |
| Flutter - Hello World (0) | 2023.05.07 |
| Flutter Project 환경설정 (iOS, Windows) (0) | 2023.05.07 |
열심히 살고 싶은 사람의 메모장
포스팅이 좋았다면 "좋아요❤️" 또는 "구독👍🏻" 해주세요!