
📘 Spring Cloud Config Server
Spring Cloud Config 는 여러 서비스 들의 설정 파일을 외부로 분리해 하나의 중앙 설정 저장소 처럼 관리 할 수 있도록 해주며 특정 설정 값이 변경시 각각의 서비스를 재기동 할 필요없이 적용이 가능하도록 도와준다.
여러 서버의 설정 파일을 중앙 서버에서 관리할 수 있다.
서버를 재배포 하지 않고 설정 파일의 변경사항을 반영할 수 있다.
하지만 이것이 모든 문제를 해결해주지는 않는다. Spring Cloud Config를 이용하면 다음의 문제들을 겪을 수 있으므로 주의해야 한다.
Git 서버 또는 설정 서버에 의한 장애가 전파될 수 있다.
우선 순위에 의해 설정 정보가 덮어씌워질 수 있다.
Spring Cloud Config 설정 파일 우선 순위
설정 파일은 크게 다음의 위치에 존재할 수 있으며 다음의 순서대로 읽어진다. 나중에 읽어지는 것이 우선순위가 높다.
- 프로젝트의 application.yaml
- 설정 저장소의 application.yaml
- 프로젝트의 application-{profile}.yaml
- 설정 저장소의 {application name}/{application name}-{profile}
만약 읽어지는 순서대로 읽다가 동일한 값을 지니는 설정 정보가 있다면 덮어 씌워지므로 주의해야 한다. 예를 들어 'hello'이라는 이름의 애플리케이션에 local 프로파일인 환경변수가 로컬의 appliation.yaml, application-local.yaml에 있고, 설정 저장소의 application.yaml, hello/hello-local.yaml에도 있다면 다음의 순서대로 읽어진다.
- 프로젝트의 application.yaml
- 설정 저장소의 application.yaml
- 프로젝트 application-local.yaml
- 설정 저장소의 hello/hello-local.yaml
최종적으로 읽혀 적용되는 환경변수 값은 설정 저장소의 hello/hello-local.yaml 의 값이다. 만약 설정 정보가 산개되어 있다면 오히려 관리가 복잡해질 수 있으며, 동작 과정을 모른다면 장애가 될 수 있으므로 주의하도록 하자.
Cloud Config Repository 생성
- Github에서 Private으로 Yaml 파일들을 저장할 Repository를 만든다.
- 이 Repository는 추후 만들 Cloud Config Server와 SSL 통신으로 Yaml파일을 불러오기 위함이다.
SSH Key 미리 생성해두기
- ssh-keygen -m PEM -t ecdsa -b 256 -C "Github 계정" -f 키파일명
- 생성된 공개키를 Github 계정에 추가
- cat key.pub
- 개인키 복사
- host-key와 host-key-algorithm 확인 후 Yml파일에 등록 = ssh-keyscan -t ecdsa github.com
📘 Cloud Config Server 설정
application.yml
spring:
  cloud:
    config:
      server:
        git:
          # config server가 참조할 yml 파일들을 모아둔 repository의 주소
          uri: Git SSH 주소로 변경
          # config server가 참조할 repository의 branch 이름은 main이다.
          default-label: main
          ignore-local-ssh-settings: true
          private-key: |
            -----BEGIN EC PRIVATE KEY-----
            비밀키는 소중해요
            비밀키는 소중해요
            비밀키는 소중해요
            -----END EC PRIVATE KEY-----
          host-key: AAAA~~~
          host-key-algorithm: ecdsa~~
          search-paths: src/**
        # 모든 설정 정보를 암호화 시키겠다는 의미
        encrypt:
          enabled: false

# actuator 설정
# management 아래의 설정들 -> actuator의 설정 정보들.
# 설정 파일의 정보가 변경된 경우에 refresh를 통해서 새로운 설정 정보를 가져올 수 있다.
management:
  endpoints:
    web:
      exposure:
        include: "*"
  endpoint:
    shutdown:
      enabled: true

# 암호화를 시키는데 사용되는 Key 값
encrypt:
  key: key-brian
암호화된 값을 yml에 넣을때 꼭 "{cipher}암호화된값" 의 형식으로 넣어야 동작함.
config 서버는 기본적으로 8888번 포트를 사용하므로 맞춰주도록 하자. 그 외에 설정 파일이 있는 위치와 디렉토리 등을 잡아주면 된다.
- uri: 설정파일이 있는 깃 주소
- default-label: 깃 주소의 브랜치 이름
- private-key : Config-Repository를 Private 레포로 만들었기 때문에 SSL 통신으로 해야하기 떄문에 개인키를 등록한다.
ssh-keygen -m PEM -t ecdsa -f 파일명
마지막으로 메인 클래스에 @EnableConfigServer를 붙여주면 서버 구성이 끝난다.
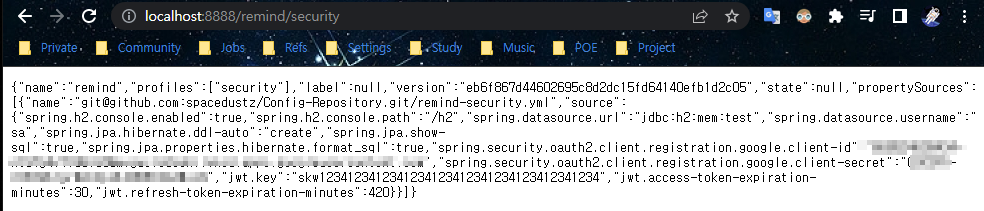
Config Server를 실행시켜서 Config Repository의 파일명을 '/'를 기준으로 나눠서 호출을 해보면 잘 나오는걸 볼 수 있다.
ex:Config-Repository의 파일명 : remind-security.ymlAPI 호출 : http://localhost:8888/remind/security
Spring Cloud Config Server에서 Cloud Repository의 Yml 파일 호출 성공
📘 Spring Cloud Config Client 설정
GET /{application}/{profile}[/{label}]
GET /{application}-{profile}.yml
GET /{label}/{application}-{profile}.yml
GET /{application}-{profile}.properties
GET /{label}/{application}-{profile}.properties
application : Spring Cloud Config Client의 application.properties (application.yml)파일에 정의한 spring.application.name 속성 값을 의미한다.
profile : Spring Cloud Config Client의 application.properties (application.yml) 파일에 정의한 spring.profiles.active 속성 값을 의미한다.
label : Optional 값으로, Git branch 정보를 의미한다.
즉, 내 Cloud Config Client 서버로 대입하면 GET /security/local/main
Client 서버 의존성 추가
- Spring Cloud Config Client
- Spring Boot Actuator
ext {
    set('springCloudVersion', "2022.0.3")
}

dependencies {
  implementation 'org.springframework.cloud:spring-cloud-config-client'
  implementation 'org.springframework.boot:spring-boot-starter-actuator'
}

dependencyManagement {
    imports {
        mavenBom "org.springframework.cloud:spring-cloud-dependencies:${springCloudVersion}"
    }
}
Client 서버 application.yml 파일에 Actuator 설정 추가, Config Server 등록
spring:
  config:
  import: "optional:configserver:http://localhost:8888" # Config-Server

# Actuator 설정
management:
  endpoints:
    web:
      exposure:
        include: "*"
이제 Config Server가 Config Repository를 스캔해서 가져온 파일들을,
어플리케이션 환경 엔드포인트에 맞게 잘 가져오는지 테스트를 위한 클래스를 생성한다.
@Getter
@Component
@RefreshScope // Config.yml 파일 변경 시 변경된 내용을 actuator를 통해 변경값을 갱신
public class CloudConfig {

    @Value("${spring.security.oauth2.client.registration.google.client-id}")
    private String oauthClientId;

    @Value("${spring.security.oauth2.client.registration.google.client-secret}")
    private String oauthClientPw;

    @Override
    public String toString() {
        return "CloudConfig{" +
                "oauthClientId='" + oauthClientId + '\'' +
                ", oauthClientPw='" + oauthClientPw + '\'' +
                '}';
    }
}
컨트롤러 생성
@RestController
@RequestMapping("/cloud")
@RequiredArgsConstructor
public class CloudController {
    private final CloudConfig config;

    @GetMapping("/remind-security")
    public String loadSecurityConfig() {
        return config.toString();
    }
}
이 후 Client로 Request를 보내보면 Config-Repoisitory의 Yml 값들이 잘 불러와진걸 볼 수 있다.
📘 @RefreshScope를 이용한 Config 변경 사항 적용
Config Server/Client가 모두 실행중인 상태에서 진행한다.
- Yml 설정 값 변경
- http://localhost:8080/actuator/refresh 를 호출하여 변경값 적용
위의 방법으로 하면 변경사항은 적용될 수 있지만 모든 인스턴스에 호출해주어야 하므로 비효율적인 작업이 된다.
이를 해결하기 위한 2가지 방법이 있다.
- Eureka 엔진으로 모든 서비스를 조회한 후 /actuator/refresh 종단점을 직접 호출하는 스크립트 작성
- Spring Cloud Bus / RabbitMQ로 변경 내용을 전파 (BroadCasting)
자동화를 위해 RabbitMQ를 활용하여 환경설정 변경 시 전파하는 방법을 알아보자.
Spring Cloud Bus를 이용하면 실행되고 있는 인스턴스의 수나 위치에 관계없이 환경설정 변경을 전파할 수 있다.
- 실행중인 인스턴스는 하나의 메시지 브로커를 통해 변경 이벤트 구독
- 변경 이벤트가 발생하면 각 인스턴스는 변경된 설정 정보를 읽어와서 Local에 Casing된 정보 갱신
- 한 인스턴스의 /actuator/busrefresh 종단점이 호출되면 모든 메시지 브로커를 통해 변경 내용 모두 전파하는 방식이다.
📘 RabbitMQ
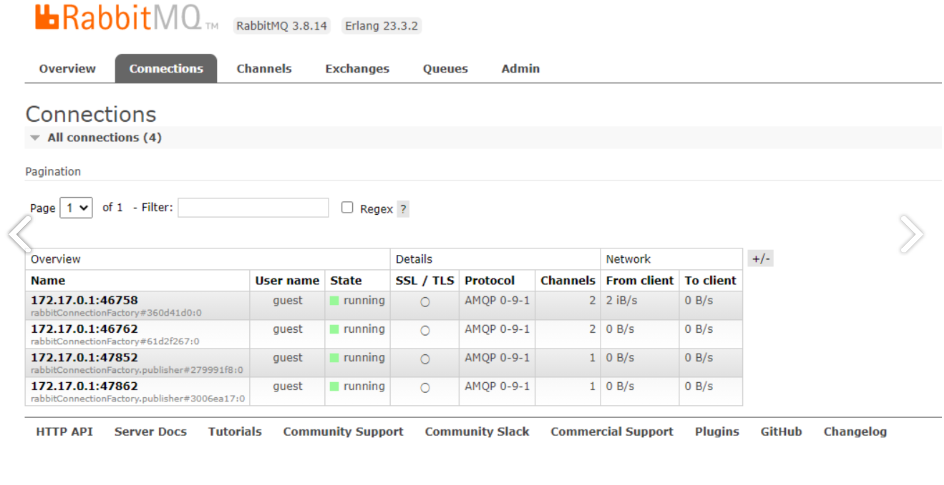
docker run -it --rm --name rabbit -p 5672:5672 -p 15672:15672 rabbitmq:3.12-management컨테이너를 실행시키고 http://locahost:15672로 접속하면 로그인 화면이 나온다.
- username : (Default) guest
- password : (Default) guest
접속하면 Connections에 접속된 Config Client를 확인할 수 있고 Excjamges에서 Spring Cloud Bus가 연결된 걸 확인할 수 있다.
📘 Config Client 의존성 추가, Yml 설정
implementatin 'org.springframework.cloud:spring-cloud-starter-bus-amqp'spring:
rabbitmq:
host: localhost
port: 5672
username: guest
password: guestConfig Client 인스턴스 1개 추가
IntelliJ에서 Edit Configuration - 실행지점을 1개 더 늘려준다.
실행 포트가 다른 인스턴스를 2개 실행시켜준다.
- 이후 Yml의 설정을 임의로 변경
- POST /actuator/busrefresh
- Config Client 8080. 8081에서 변경된 내용 확인
'📘 Backend > Spring Cloud' 카테고리의 다른 글
| Spring Cloud Stream + RabbitMQ Binder (2) | 2025.02.03 |
|---|---|
| Distributed Log Tracing (Zipkin + Spring Cloud Sleuth) (4) | 2024.12.27 |
| Spring Cloud Config (0) | 2023.04.04 |
| Spring Cloud Gateway (Eureka) (0) | 2023.04.04 |